


The content below is taken from the original ( First Look at Azure Static Web Apps), to continue reading please visit the site. Remember to respect the Author & Copyright.
At Build 2020, Microsoft announced Azure Static Web Apps, a new way to host static web apps on Azure. In the past, static web apps, which are just a combination of HTML, JavaScript and CSS, could be hosted in a Storage Account or a regular Azure Web App.
When you compare Azure Static Web Apps with the Storage Account approach, you will notice there are many more features. Some of those features are listed below (also check the docs):
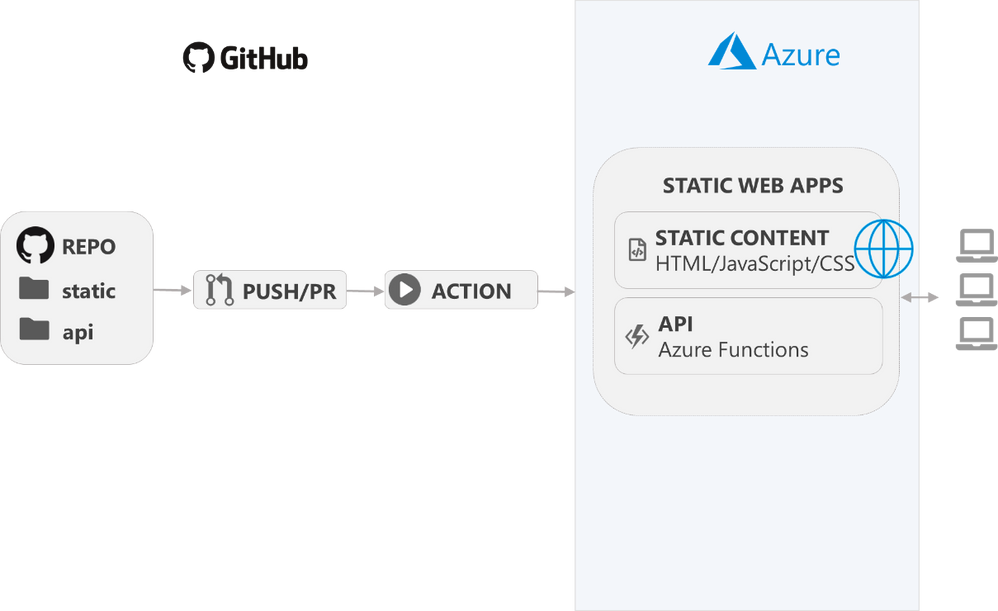
- GitHub integration: GitHub actions are configured for you to easily deploy your app from your GitHub repository to Azure Static Web Apps
- Integrated API support: APIs are provided by Azure Functions with an HTTP Trigger
- Authentication support for Azure Active Directory, GitHub and other providers
- Authorization role definitions via the portal and a roles.json file in your repository
- Staging versions based on a pull request
It all works together as shown below:
As a Netlify user, this type of functionality is not new to me. Next to static site hosting, they also provide serverless functions, identity etc…
Let’s check out an example to see how it works on Azure…
GitHub repository
The GitHub repo I used is over at https://github.com/gbaeke/az-static-web-app. You will already see the .github/workflows folder that contains the .yml file that defines the GitHub Actions. That folder will be created for you when you create the Azure Static Web App.
The static web app in this case is a simple index.html that contains HTML, JavaScript and some styling. Vue.js is used as well. When you are authenticated, the application reads a list of devices from Cosmos DB. When you select a device, the application connects to a socket.io server, waiting for messages from the chosen device. The backend for the messages come from Redis. Note that the socket.io server and Redis configuration are not described in this post. Here’s a screenshot from the app with a message from device01. User gbaeke is authenticated via GitHub. When authenticated, the device list is populated. When you log out, the device list is empty. There’s no error checking here so when the device list cannot be populated, you will see a 404 error in the console. 

Note: Azure Static Web Apps provides a valid certificate for your app, whether it uses a custom domain or not; in the above screenshot, Not secure is shown because the application connects to the socket.io server over HTTP and Mixed Content is allowed; that is easy to fix with SSL for the socket.io server but I chose to not configure that
The API
Although API is probably too big a word for it, the devices drop down list obtains its data from Cosmos DB, via an Azure Function. It was added from Visual Studio Code as follows:
- add the api folder to your project
- add a new Function Project and choose the api folder: simply use F1 in Visual Studio Code and choose Azure Functions: Create New Project… You will be asked for the folder. Choose api.
- modify the code of the Function App to request data from Cosmos DB
To add an Azure Function in Visual Studio Code, make sure you install the Azure Functions extension and the Azure Function Core Tools. I installed the Linux version of Core Tools in WSL 2.
Adding the function (JavaScript; HTTP Trigger, anonymous, name of GetDevice) should result in the following structure:

Next, I modified function.json to include a Cosmos DB input next to the existing HTTP input and output:
{
  "bindings": [
    {
      "authLevel": "anonymous",
      "type": "httpTrigger",
      "direction": "in",
      "name": "req",
      "methods": [
        "get",
        "post"
      ],
      "route": "device"
    },
    {
      "type": "http",
      "direction": "out",
      "name": "res"
    },
    {
      "name": "devices",
      "type": "cosmosDB",
      "direction": "in",
      "databaseName": "geba",
      "collectionName": "devices",
      "sqlQuery": "SELECT c.id, c.room FROM c",
      "connectionStringSetting": "CosmosDBConnection"
    }
  ]
}
In my case, I have a Cosmos DB database geba with a devices collection. Device documents contain an id and room field which simply get selected with the query: SELECT c.id, c.room FROM c.
Note: with route set to device, the API will need to be called with /api/device instead of /api/GetDevice.
The actual function in index.js is kept as simple as possible:
module.exports = async function (context, req) {
    context.log('Send devices from Cosmos');

    context.res = {
        // status: 200, /* Defaults to 200 */
        body: context.bindings.devices
    };

};
Yes, the above code is all that is required to retrieve the JSON output of the Cosmos DB query and set is as the HTTP response.
Note that local.settings.json contains the Cosmos DB connection string in CosmosDBConnection:
{
  "IsEncrypted": false,
  "Values": {
    "AzureWebJobsStorage": "",
    "FUNCTIONS_WORKER_RUNTIME": "node",
    "CosmosDBConnection": "AccountEndpoint=https://geba-cosmos.documents.a...;"
  }
}
You will have to make sure the Cosmos DB connection string is made known to Azure Static Web App later. During local testing, local.settings.json is used to retrieve it. local.settings.json is automatically added to .gitignore to not push it to the remote repository.
Local Testing
We can test the app locally with the Live Server extension. But first, modify .vscode/settings.json and add a proxy for your api:
"liveServer.settings.proxy": {
        "enable": true,
        "baseUri": "/api",
        "proxyUri": "http://172.28.242.32:7071/api"
    }
With the above setting, a call to /api via Live Server will be proxied to Azure Functions on your local machine. Note that the IP address refers to the IP address of WSL 2 on my Windows 10 machine. Find it by running ifconfig in WSL 2.
Before we can test the application locally, start your function app by pressing F5. You should see:

Now go to index.html, right click and select Open with Live Server. The populated list of devices shows that the query to Cosmos DB works and that the API is working locally:

Notes on using WSL 2:
- for some reason, http://localhost:5500/index.html (Live Server running in WSL 2) did not work from the Windows session although it should; in the screenshot above, you see I replaced localhost with the IP address of WSL 2
- time skew can be an issue with WSL 2; if you get an error during the Cosmos DB query of authorization token is not valid at the current time, perform a time sync with ntpdate time.windows.com from your WSL 2 session
Deploy the Static Web App
Create a new Static Web App in the portal. The first screen will be similar to the one below:

You will need to authenticate to GitHub and choose your repository and branch as shown above. Click Next. Fill in the Build step as follows:

Our app will indeed run off the root. We are not using a framework that outputs a build to a folder like dist so you can leave the artifact location blank. We are just serving index.html off the root.
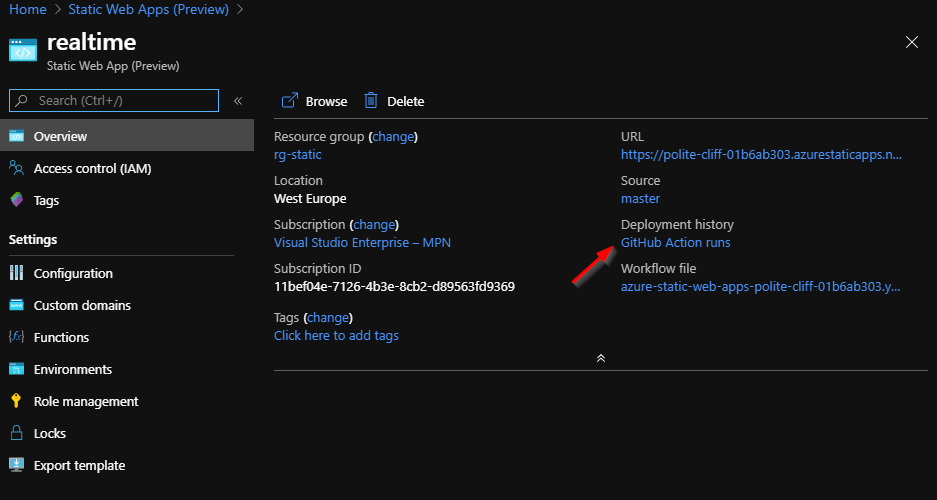
Complete the steps for the website to be created. You GitHub Action will be created and run for the first time. You can easily check the GitHub Action runs from the Overview screen:
Here’s an example of a GitHub action run:

When the GitHub Action is finished, your website will be available on a URL provided by Azure Static Web Apps. In my case: https://polite-cliff-01b6ab303.azurestaticapps.net.
To make sure the connection to Cosmos DB works, add an Application Setting via Configuration:

The Function App that previously obtained the Cosmos DB connection string from local.settings.json can now retrieve the value from Application Settings. Note that you can also change these settings via Azure CLI.
Conclusion
In this post, we created a simple web app in combination with an function app that serves as the API. You can easily create and test the web app and function app locally with the help of Live Server and a Live Server proxy. Setting up the web app is easy via the Azure Portal, which also creates a GitHub Action that takes care of deployment for you. In a next post, we will take a look at enabling authentication via the GitHub identity provider and only allowing authorized users to retrieve the list of devices.
