The content below is taken from the original (Scratch 2.0: all-new features for your Raspberry Pi), to continue reading please visit the site. Remember to respect the Author & Copyright.
We’re very excited to announce that Scratch 2.0 is now available as an offline app for the Raspberry Pi! This new version of Scratch allows you to control the Pi’s GPIO (General Purpose Input and Output) pins, and offers a host of other exciting new features.
Offline accessibility
The most recent update to Raspbian includes the app, which makes Scratch 2.0 available offline on the Raspberry Pi. This is great news for clubs and classrooms, where children can now use Raspberry Pis instead of connected laptops or desktops to explore block-based programming and physical computing.
Controlling GPIO with Scratch 2.0
As with Scratch 1.4, Scratch 2.0 on the Raspberry Pi allows you to create code to control and respond to components connected to the Pi’s GPIO pins. This means that your Scratch projects can light LEDs, sound buzzers and use input from buttons and a range of sensors to control the behaviour of sprites. Interacting with GPIO pins in Scratch 2.0 is easier than ever before, as text-based broadcast instructions have been replaced with custom blocks for setting pin output and getting current pin state.
To add GPIO functionality, first click ‘More Blocks’ and then ‘Add an Extension’. You should then select the ‘Pi GPIO’ extension option and click OK.
In the ‘More Blocks’ section you should now see the additional blocks for controlling and responding to your Pi GPIO pins. To give an example, the entire code for repeatedly flashing an LED connected to GPIO pin 2.0 is now:
To react to a button connected to GPIO pin 2.0, simply set the pin as input, and use the ‘gpio (x) is high?’ block to check the button’s state. In the example below, the Scratch cat will say “Pressed” only when the button is being held down.
Cloning sprites
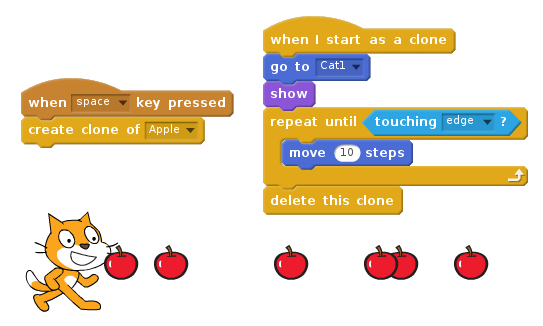
Scratch 2.0 also offers some additional features and improvements over Scratch 1.4. One of the main new features of Scratch 2.0 is the ability to create clones of sprites. Clones are instances of a particular sprite that inherit all of the scripts of the main sprite.
The scripts below show how cloned sprites are used — in this case to allow the Scratch cat to throw a clone of an apple sprite whenever the space key is pressed. Each apple sprite clone then follows its ‘when i start as clone’ script.

The cloning functionality avoids the need to create multiple copies of a sprite, for example multiple enemies in a game or multiple snowflakes in an animation.
Custom blocks
Scratch 2.0 also allows the creation of custom blocks, allowing code to be encapsulated and used (possibly multiple times) in a project. The code below shows a simple custom block called ‘jump’, which is used to make a sprite jump whenever it is clicked.
These custom blocks can also optionally include parameters, allowing further generalisation and reuse of code blocks. Here’s another example of a custom block that draws a shape. This time, however, the custom block includes parameters for specifying the number of sides of the shape, as well as the length of each side.
The custom block can now be used with different numbers provided, allowing lots of different shapes to be drawn.

Peripheral interaction
Another feature of Scratch 2.0 is the addition of code blocks to allow easy interaction with a webcam or a microphone. This opens up a whole new world of possibilities, and for some examples of projects that make use of this new functionality see Clap-O-Meter which uses the microphone to control a noise level meter, and a Keepie Uppies game that uses video motion to control a football. You can use the Raspberry Pi or USB cameras to detect motion in your Scratch 2.0 projects.
Other new features include a vector image editor and a sound editor, as well as lots of new sprites, costumes and backdrops.
Update your Raspberry Pi for Scratch 2.0
Scratch 2.0 is available in the latest Raspbian release, under the ‘Programming’ menu. We’ve put together a guide for getting started with Scratch 2.0 on the Raspberry Pi online (note that GPIO functionality is only available via the desktop version). You can also try out Scratch 2.0 on the Pi by having a go at a project from the Code Club projects site.
As always, we love to see the projects you create using the Raspberry Pi. Once you’ve upgraded to Scratch 2.0, tell us about your projects via Twitter, Instagram and Facebook, or by leaving us a comment below.
The post Scratch 2.0: all-new features for your Raspberry Pi appeared first on Raspberry Pi.


