The content below is taken from the original ( Adding custom intelligence to Gmail with serverless on GCP), to continue reading please visit the site. Remember to respect the Author & Copyright.
If you are using G Suite at work, you probably have to keep track of tons of data spread across Gmail, Drive, Docs, Sheets and Calendar. If only there was a simple, but scalable way to tap this data and have it nudge you based on signals of your choice. In this blog post, we’ll show you how to build powerful Gmail extensions using G Suite’s REST APIs, Cloud Functions and other fully managed services on Google Cloud Platform (GCP).

There are many interesting use cases for GCP and G Suite. For example, you could mirror your Google Drive files into Cloud Storage and run it through the Cloud Data Loss Prevention API. You could train your custom machine learning model with Cloud AutoML. Or you might want to export your Sheets data into Google BigQuery to merge it with other datasets and run analytics at scale. In this post, we’ll use Cloud Functions to specifically talk to Gmail via its REST APIs and extend it with various GCP services. Since email remains at the heart of how most companies operate today, it’s a good place to start and demonstrate the potential of these services working in concert.
Architecture of a custom Gmail extension
High email volumes can be hard to manage. Many email users have some sort of system in place, whether it’s embracing the “inbox zero,” setting up an elaborate system of folders and flags, or simply flushing that inbox and declaring “email bankruptcy” once in a while.
Some of us take it one step further and ask senders to help us prioritize our emails: consider an auto-response like “I am away from my desk, please resend with URGENT123 if you need me to get back to you right away.” In the same vein, you might think about prioritizing incoming email messages from professional networks such as LinkedIn by leaving a note inside your profile such as “I pay special attention to emails with pictures of birds.” That way, you can auto-prioritize emails from senders who (ostensibly) read your entire profile.
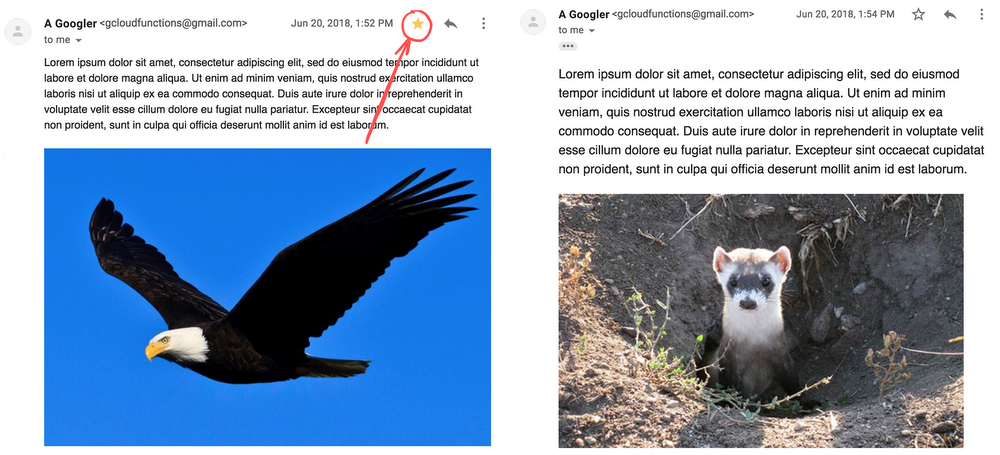
Our sample app does exactly this, and we’re going to fully describe what this app is, how we built it, and walk through some code snippets.
Here is the architectural diagram of our sample app:
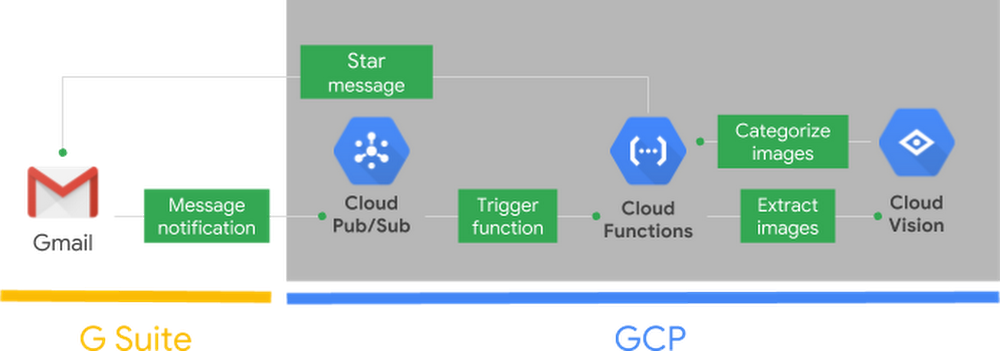
There are three basic steps to building our Gmail extension:

Without further ado, let’s dive in!
How we built our app
Building an intelligent Gmail filter involves three major steps, which we’ll walk through in detail below. Note that these steps are not specific to Gmail—they can be applied to all kinds of different G Suite-based apps.
Step 1. Authorize access to G Suite data
The first step is establishing initial authentication between G Suite and GCP. This is a universal step that applies to all G Suite products, including Docs, Slides, and Gmail.
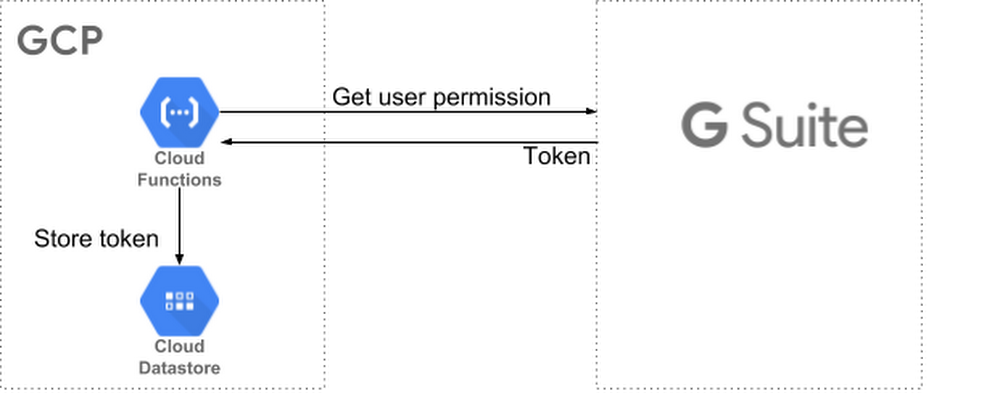
In order to authorize access to G Suite data (without storing the user’s password), we need to get an authorization token from Google servers. To do this, we can use an HTTP function to generate a consent form URL using the OAuth2Client:
This function redirects a user to a generated URL that presents a form to the user. That form then redirects to another “callback” URL of our choosing (in this case, oauth2callback) with an authorization code once the user provides consent. We save the auth token to Cloud Datastore, Google Cloud’s NoSQL database. We’ll use that token to fetch email on the user’s behalf later. Storing the token outside of the user’s browser is necessary because Gmail can publish message updates to a Cloud Pub/Sub topic, which triggers functions such as onNewMessage. (For those of you who aren’t familiar with Cloud Pub/Sub, it’s a GCP distributed notification and messaging system that guarantees at-least-once delivery.)
Let’s take a look at the oauth2callback function:
This code snippet uses the following helper functions
-
getEmailAddress: gets a user’s email address from an OAuth 2 token
-
fetchToken: fetches OAuth 2 tokens from Cloud Datastore (and auto-refreshes them if they are expired)
-
saveToken: saves OAuth 2 tokens to Cloud Datastore
Now, let’s move on to subscribing to Gmail changes by initializing a Gmail watch.
Step 2: Initialize a ‘watch’ for Gmail changes
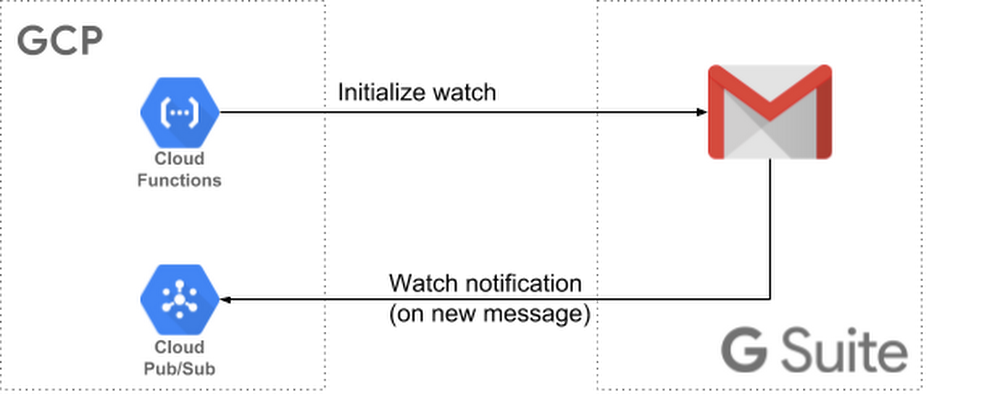
Gmail provides the watch mechanism for publishing new email notifications to a Cloud Pub/Sub topic. When a user receives a new email, a message will be published to the specified Pub/Sub topic. We can use this message to invoke a Pub/Sub-triggered Cloud Function that processes the incoming message.
In order to start listening to incoming messages, we must use the OAuth 2 token that we obtained in Step 1 to first initialize a Gmail watch on a specific email address, as shown below. One important thing to note is that the G Suite API client libraries don’t support promises at the time of writing, so we use pify to handle the conversion of method signatures.
Now that we have initialized the Gmail watch, there is an important caveat to consider: the Gmail watch only lasts for seven days and must be re-initialized by sending an HTTP request containing the target email address to initWatch. This can be done either manually or via a scheduled job. For brevity, we used a manual refresh system in this example, but an automated system may be more suitable for production environments. Users can initialize this implementation of Gmail watch functionality by visiting the oauth2init function in their browser. Cloud Functions will automatically redirect them (first to oauth2callback, and then initWatch) as necessary.
We’re ready to take action on the emails that this watch surfaces!
Step 3: Process and take action on emails
Now, let’s talk about how to process incoming emails. The basic workflow is as follows:
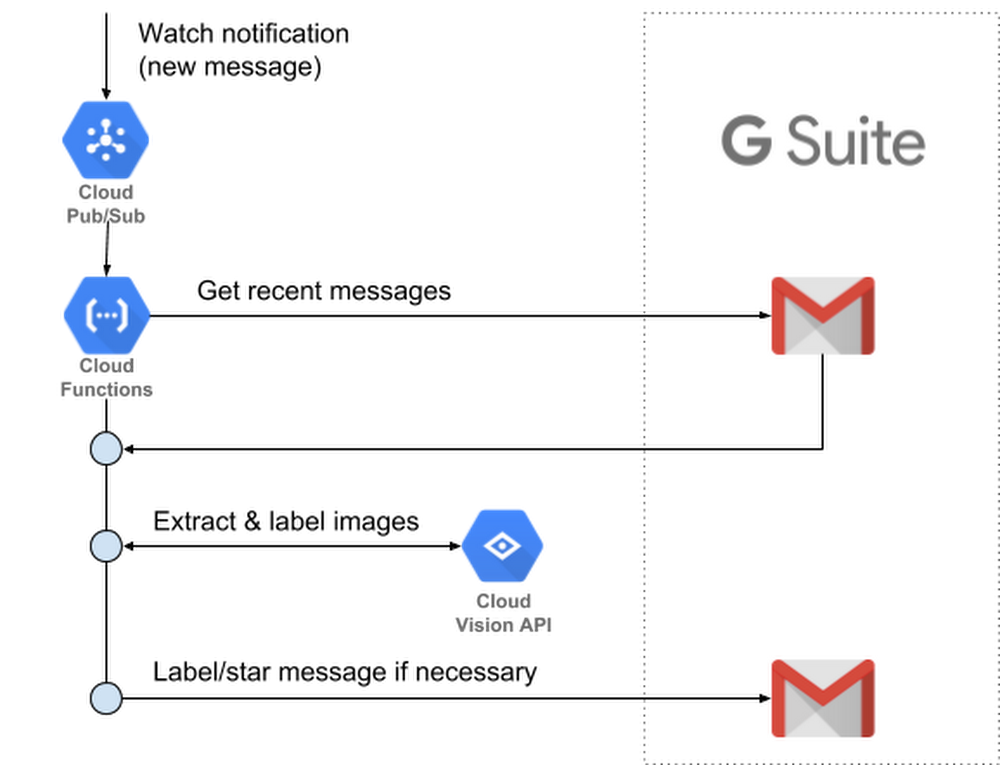
As discussed earlier, Gmail watches publish notifications to a Cloud Pub/Sub topic whenever new email messages arrive. Once those notifications arrive, we can fetch the new message IDs using the gmail.users.messages.list, and their contents using the gmail.users.messages.get API call. Since we’re only processing email content once, we don’t need to store any data externally.
Once our function extracts the images within an email, we can use the Cloud Vision API to analyze these images and check if they contain a specific object (such as birds or food). The API returns a list of object labels (as strings) describing the provided image. If that object label list contains bird, we can use the gmail.users.messages.modify API call to mark the message as “Starred”.
This code snippet uses the following helper functions
-
listMessageIds: fetches the most recent message IDs using
gmail.users.messages.list -
getMessageById: gets the most recent message given its ID using
gmail.users.messages.get -
getLabelsForImages: detects object labels in each image using the Cloud Vision API
-
labelMessage: adds a Gmail label to the message using
gmail.users.messages.modify
Please note that we’ve abstracted most of the boilerplate code into the helper functions. If you want to take a deeper dive, the full code can be seen here along with the deployment instructions.
Wrangle your G Suite data with Cloud Functions and GCP
To recap, in this tutorial we built a scalable application that processes new email messages as they arrive to a user’s Gmail inbox and flags them as important if they contain a picture of a bird. This is of course only one example. Cloud Functions makes it easy to extend Gmail and other G Suite products with GCP’s powerful data analytics and machine learning capabilities—without worrying about servers or backend implementation issues. With only a few lines of code, we built an application that automatically scales up and down with the volume of email messages in your users’ accounts, and you will only pay when your code is running. (Hint: for small-volume applications, it will likely be very cheap—or even free—thanks to Google Cloud Platform’s generous Free Tier.)
To learn more about how to programmatically augment your G Suite environment with GCP, check out our Google Cloud Next ‘18 session G Suite Plus GCP: Building Serverless Applications with All of Google Cloud, for which we developed this demo. You can watch that entire talk here:
You can find the source code for this project here.
Happy building!


